Some Background Stories Before We Dive In
Even seen the movies, or animations, or shows about Batman where Batman's has his own lair called the Batcave? Yes, you did watched? Nice, you can skip the few paragraphs after this and head straight to the main content.
No you didn't watched anything about Batman? No worries it's fine! I'll explain to you right now to let you know why I'm so excited about this.
The Batcave is a secret headquarter for Batman and other superheroes under the Watne Manor. And one of the most famous part of the Batcave is the Central Computer Console, where Batman uses it daily to do research works and solve crimes.
So the above passage is a short description of what is the Batcave, what's most interesting of the Batcave is how it's connected to the world with networks through telecommunication, and satellites, truly a real globalisation.
But lets get back to reality and my current project of Smart Home LLM Agent. One of my 2026 goals was to build a smart home system that integrates an LLM for controlling IoT devices such as light switches, air conditioning, door locks, vacuum cleaners and more. So, imagine just saying "turn off all lights downstairs, make sure all the doors are lock, and nobody is downstairs, if there's somebody (not someone like a burglar obviously!) downstairs, refer to them for instructions instead" when you're going to bad and having the Smart Home Agent to do the work for you, everything just work through natural language processing, or in layman terms, through how we talk. This is a near future scenario where I believe will happens in a decade time as AI Agents are getting more and more popular and widespread in their usage, such as Clawbot released in November 2025.
Why Not Just Use ChatGPT? Or Claude?
Let's tackle the elephant in the room, ChatGPT exists, Claude exists, DeepSeek exists, there's so much existing options to choose from the market, so why bother with self-hosting, fine-tuning, whatsoever, instead of just using them?
There's three reasons for me:
Data is the new oil. Every command I sent to the cloud, every information I provided to the model, everytime I are using the chatbot, I could be providing my data to the chatbot provider. "Turning off the bedroom fan" seems harmless at first, but over time these logs can paint and construct a detailed picture of how my life operates, when I sleep, when I leave home, what devices I own. Although AI companies has been promising to protect user's data, research from Hasal et al. (2021) [1] and Yang et al. (2023) [2] still raised concerns on security, privacy risk and vulnerabilities to be addressed. Studies from King et al. (2025) [3] showed that some AI companies uses conversation data to train their AI better at understanding. All of these are just the ones that are at least more transparent at how they operates, there's no guarantee that no third party organisations, legal or illegal, won't get hold on our data and exploit them.
Cost. API calls can add up the cost. For example, a smart home that queries an LLM dozens of times a day would rack up a real bill if the input (to provide context, or conversation histories) and output (if you didn't tell the chatbot to not reply a long essay after you ask it to close the lights) are not controlled well. But how exactly will the price be? According to the API pricing from ChatGPT [4]
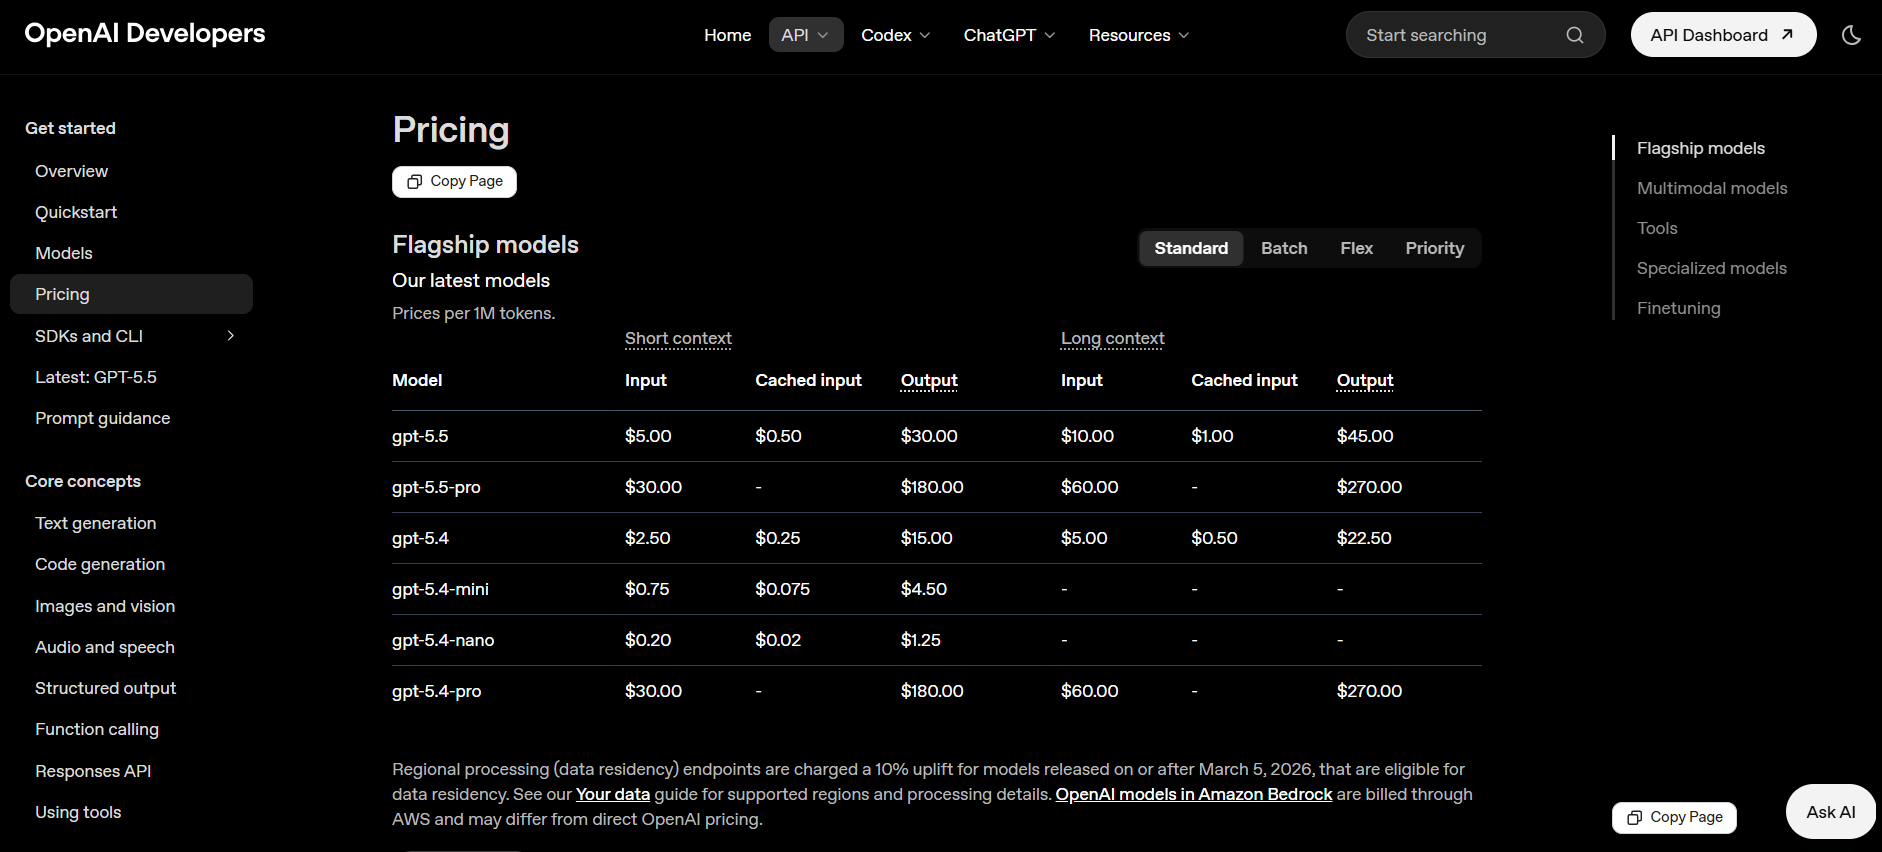
and Claude [5]
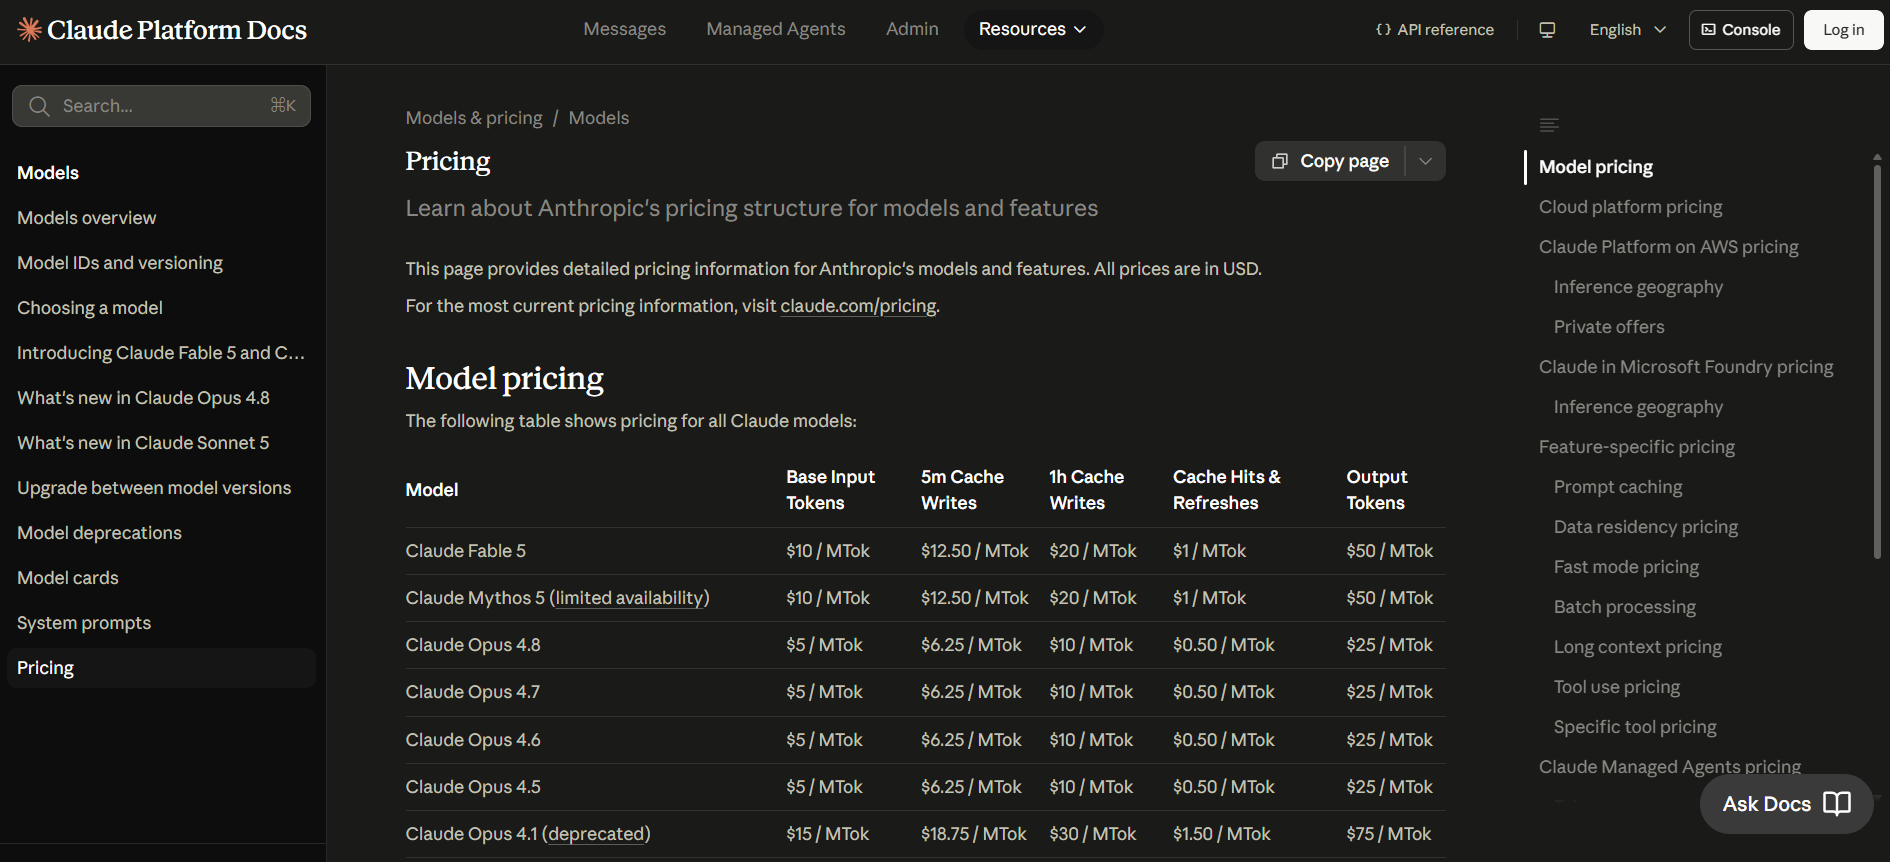
using a modest (do you really need your Smart Home Agent to discuss quantum physics with you?) LLM model such as gpt-5.5 for ChatGPT and Opus 4.6 for Claude, the cost for 1 Million token (a rule of thumb is 1 token euqals to around 3/4 of a word [6]) is around $5 for both model's input, while $45 and $25 for the model's output. The cost doesn't seems quite high, and it is, if you control the model input and output well, this method could definitely be very useful and effective to limit the cost within acceptable limit while leveraging the powerful model to your goal. But if you didn't configure the settings well, the 1 million tokens would quickly be used up and wasted. So there's always "one thing" to keep in mind, and that is to not used up too much token.
Independence. The policies of the chatbot provider can always changes, even though they will probably announce the change, there's no guarantee that you, as the user can keep up with it if the changes are made obsurely. For example if OpenAI changes their pricing, their API, or their terms, my smart home breaks. So I wanted something I owned completely.
So the goal was clear, run everything locally if possible. No cloud, no subscriptions, no data leaving my home.
The Hardware Reality
My first instinct was to rent a VPS. I looked into DigitalOcean's GPU droplets, which start around $0.76/GPU/hour for on-demand instances. Running that 24/7 would cost more than RM500/month. Too expensive for a home project.
But I realised I actually already had the hardware.
A GMK NucBox M6 sitting on my desk. AMD Ryzen 5 6640H, 16GB DDR5 RAM. It's not a powerhouse, but enough for what I needed now.
The truth about running LLMs on CPU: it's slow. Phi-4 14B takes about 20 to 30 seconds to generate a response on my hardware and could be using up all my RAM and cause my mini PC so much lagginess. That's not ideal as it could disrupt my usage on the mini PC, but it's workable, especially for a smart home that isn't handling thousands of requests per day.
I considered adding an eGPU via the USB4 port. I looked at AMD RX 6700 XT configurations around RM1200-1600. But the Linux + AMD USB4 + eGPU combination has mixed community support, and this setup is just for apartment testing anyway.
The Final Decision: accept the slow response time for now. Build it right at the family house later with a proper desktop tower and PCIe GPU.
Sometimes the right engineering decision is knowing when good enough is actually good enough.
The Stack
Here's what I ended up running, all on one mini PC:
Ollama          — runs the LLM models
Open WebUI      — ChatGPT-like browser interface
Home Assistant  — smart home hub, device control
Whisper         — speech to text (installed, WIP)
Piper           — text to speech (installed, WIP)
Tailscale       — secure remote access, no public IP needed
All containerised with Docker, except Ollama which runs as a native service. Everything accessible from anywhere via Tailscale.
Total monthly cost: electricity. Roughly RM0.30 based on Malaysian tariffs [7] at ~1.5kWh average draw per month, so... yea, not even RM1 running all those stuff. A small price to pay for my peace of mind.
Building It in Stages
I didn't try to build everything at once. That's how projects die, you get overwhelmed, nothing works, and gives up.
So instead, I broke it into six stages with a clear milestone at each step.
Stage 1: Get It Running
Install Ollama. Pull a model. Chat with it in the terminal.
curl -fsSL https://ollama.com/install.sh | sh
ollama pull mistral
ollama run mistral
That's it! Three commands and I had a working local LLM. The goal wasn't impressive, it was just to prove the foundation worked before building anything on top of it.
Stage 2: Make It Accessible
Installed Open WebUI via Docker. Now I had a proper browser interface accessible from any device on my network from my phone to my laptop, anything.
Hit a snag immediately: Open WebUI couldn't find Ollama. The fix was explicitly setting the Ollama URL when creating the container:
docker run -d \
  --network=host \
  -e OLLAMA_BASE_URL=http://127.0.0.1:11434 \
  -v open-webui:/app/backend/data \
  --name open-webui \
  --restart always \
  ghcr.io/open-webui/open-webui:main
Lesson learned: don't assume services can find each other. Be explicit.
With Tailscale, the whole setup became accessible from anywhere. Not just my home network, but anywhere in the world, securely, without a public IP or port forwarding.
Stage 3: Give It Personality
A generic LLM is useful. A personalised one is yours.
I wrote a system prompt that told the LLM exactly who it was talking to, a family home in Malaysia, smart devices currently installed, server specs, future plans. Now instead of generic smart home advice, it gives advice relevant to my setup.
I also tested three models: Mistral 7B, Llama 3.2 3.2B, and Phi-4 14B. Mistral and Llama were faster but chattier. Phi-4 was slower but more concise and accurate.
For a smart home assistant, accurate beats fast. Phi-4 became my default for Open WebUI.
Stage 4: Give It Memory
This is where it stopped feeling like a demo and started feeling like a real tool.
I wrote a markdown document describing my entire home setup, devices, IPs, room layout, future plans, and uploaded it to Open WebUI's knowledge base. Now when I ask "what smart devices do I have?" it answers based on my actual setup, not generic training data. For example:
### Smart Plug — TP-Link Tapo P304M (4-way power bar)
- IP: 192.168.100.74
- Slot 1: CCTV
- Slot 2: Blue Laptop
- Slot 3: Adapter / Mini PC
- Slot 4: Fan
One habit I'm building: update this document every time something changes. It's the single source of truth for my smart home.
Stage 5: Actually Control Things
Home Assistant was the bridge between the LLM and my physical devices. Install it, connect the TP-Link Tapo integration, and suddenly my smart plug and camera showed up as controllable entities.
I hit two interesting problems here.
Problem 1: Phi-4 doesn't support tool calling, which is what Home Assistant needs to control devices. The error was clear:
phi4:latest does not support tools (status code: 400)
Solution: use Llama 3.1:8b for Home Assistant's conversation agent and keep Phi-4 for Open WebUI chat. Different models for different jobs.
Problem 2: Even with the right model, natural language commands were unreliable. The LLM would say "Done!" but nothing happened physically.
The fix (or workaround I would say) that I implemented is to stop relying on the LLM for device control entirely for now and use Home Assistant's built-in sentence triggers instead, explicit trigger phrases mapped directly to actions. Fast, reliable, zero LLM overhead for simple commands. Enhancing the speech control will be an improvement project for me in the future to make the integration better.
"Turn on the fan" → switch.turn_on → switch.fan → *fan turn on*
The LLM handles conversation and questions. Home Assistant handles commands. Clean separation of concerns and responsibilities.
Stage 6: Automate and Notify
With device control working, I added the layer that makes it actually smart: automations.
Time-based:
- Fan off at 23:00
- CCTV on at 07:00, off at 23:00
Location-based (using phone GPS via Companion App):
- Fan off when I leave home
- Warning notification if fan turns on while I'm away
Notifications via Telegram so every automation sends me a message when it triggers. I can sit at the office and know exactly what's happening at home.
One note on Telegram setup: the YAML configuration method is deprecated in the Home Assistant version I used. Set it up through the UI integrations page instead, I spent some extra time on this one, but a good lesson learned indeed.
What Broke Along the Way
Honest list, because the smooth version of this story isn't the real one:
Tapo camera authentication failed: cameras use a local device password, not your Tapo account credentials. Got locked out for 30 minutes from too many attempts. Read the docs before you try things repeatedly.
Phi-4 tool calling: spent time debugging before realising it's a model limitation, not a config issue. The error message was clear, I just didn't read it carefully enough.
Bluetooth errors in Home Assistant logs: alarming looking errors that turned out to be completely harmless. Docker containers don't have Bluetooth permissions by default. Doesn't affect anything smart home related.
YAML vs UI configuration: Home Assistant is moving integrations from YAML to UI setup. What worked in tutorials from 2024 doesn't always work now.
Model Comparison: What I Actually Found
After testing several models on my hardware:
| Model | Speed | Quality | Tool Support | Best For |
|---|---|---|---|---|
| Phi-4 14B | Slow (~20s) | Best | ✗ | Smart questions, knowledge base |
| Llama 3.1 8B | Medium | Good | ✓ | Home Assistant device control |
| Mistral 7B | Fast | Good | ✓ | Quick chat, fallback |
| Llama 3.2 3B | Fastest | Okay | ✓ | Simple commands only |
The right model depends on the job. I stopped looking for one model to rule them all.
The Architecture That Works
After all the iterations, here's what's running on my stack:
Me (anywhere via Tailscale)
        │
        ├── Open WebUI → Phi-4 14B
        │   └── Knowledge base (home-setup.md)
        │   └── Smart questions, advice, context
        │
        └── Home Assistant → Llama 3.1 8B
            └── Sentence triggers (reliable device control)
            └── Automations (time + location based)
            └── Telegram notifications
                │
                ├── CCTV plug ✓
                ├── Laptop plug ✓
                ├── Mini PC plug ✓
                └── Fan plug ✓
What's Next
This apartment setup is a testing ground, not the final product. When I move to setting up the family house, the upgrade list is clear:
Hardware:
- Proper desktop tower with PCIe GPU (RTX 3060 12GB is the target)
- USB microphone + speaker for voice control
- More devices: smart lights, door locks, temperature sensors
- Activate the TP-Link Deco X50 mesh properly
Software:
- Voice control pipeline (Whisper + Piper + mic) — installed but incomplete
- Home Assistant OS instead of Container for full add-on support
- Expanded knowledge base per room
- More sophisticated automations
The goal that started this: saying "turn off all lights downstairs" and having it work. I'm not there yet. But I can say "turn off the fan" and it works — reliably, locally, privately.
There will be more, and I mean a lot more, for me to improve my Smart Home Agent for it to obtain the holy grail status of my Batcave imagination, the journey will be hard, but I'll definitely enjoy its exhilarating experience.
What I'd Tell Myself at the Start
Don't start with the final vision. Start with "does Ollama run?" and build from there. Every stage taught me something that made the next stage easier.
Slow response times are fine for testing. 20 to 30 seconds feels painful at first. Then you stop noticing it. The functionality matters more than the speed at this stage. Plus I'm not serving hundreds of users at the same time.
Separate your concerns. LLM for intelligence, Home Assistant for reliability. Trying to make the LLM do everything leads to frustration.
Document as you go. The home-setup.md knowledge base started as a necessity and became genuinely useful. When something breaks at 11pm and you can't remember your device IPs, you'll be glad you wrote it down.
This is a marathon, not a sprint. It took multiple sessions, several debugging rabbit holes, and a lot of "let me check the logs again." But that's normal. It's supposed to take time.
Final Thoughts
I have a private AI assistant running on hardware I own, accessible from anywhere, controlling physical devices in my home with zero ongoing subscription cost and zero data leaving my network.
That sentence would have seemed ambitious in January. Now it's just Tuesday.
The smart home LLM goal from my 2026 resolutions isn't fully complete, voice control is still pending, the family house deployment hasn't started, and there are automations I haven't built yet. But the foundation is solid.
And unlike a lot of my 2025 projects, this one actually works and is progressing rapidly.
References Materials
-
Hasal, M., Nowaková, J., Saghair, K. A., Abdulla, H., Snášel, V., & Ogiela, L. (2021). Chatbots: Security, privacy, data protection, and social aspects. Concurrency and Computation Practice and Experience, 33(19). https://doi.org/10.1002/cpe.6426
-
Yang, J., Chen, Y., Por, L. Y., & Ku, C. S. (2023). A Systematic Literature review of information security in Chatbots. Applied Sciences, 13(11), 6355. https://doi.org/10.3390/app13116355
-
King, J., Klyman, K., Capstick, E., Saade, T., & Hsieh, V. (2025). User privacy and large language models: An analysis of frontier developers’ privacy policies. arXiv (Cornell University). https://doi.org/10.48550/arxiv.2509.05382
-
OpenAI. (n.d.). Pricing. Openai. https://developers.openai.com/api/docs/pricing
-
Pricing. (n.d.). Claude Platform Docs. https://platform.claude.com/docs/en/about-claude/pricing
-
OpenAI. (2026, June 16). What are tokens and how to count them? Openai. https://help.openai.com/en/articles/4936856-what-are-tokens-and-how-to-count-them
-
Pricing & Tariff. (n.d.). Welcome to myTNB Portal. https://www.mytnb.com.my/residential/understand-your-bill/pricing-tariff
Building something similar or have questions about the setup? Reach out at [email protected] or connect on LinkedIn. Always happy to talk infrastructure.